Download Behringer Usb Audio Driver
Berikut ini adalah contoh. Promes pai sd kelas 1 6 kurikulum 2013. Yang bisa digunakan untuk melengkapi administarsi guru yang dapat di unduh secara gratis dengan menekan tombol download. Menurut Kemdikbud RPP adalah rencana pembelajaran Read More Contoh RPP Kurikulum 2013 Kelas 1,2,3,4,5,6 SD - berikut ini adalah Contoh RPP Kurikulum 2013 Kelas 1,2,3,4,5,6 SD yang bisa anda download secara gratis di website kami. Download Contoh RPP PAI SD/MI Kurikulum 2013 Kelas 1 2 3 4 5 6 Format Microsoft Word Terbaru 2017| Dokumen Guru Sekolah ini ditujukan bagi siapa saja yang. Kurikulum 2013 Revisi Blog Blog berharap RPP PAI SD Kurikulum 2013 KEMENAG Lengkap Kelas 1,2,3, 4,5 dan 6 ini merupakan contoh berkas atau informasi sebagai sumber acuan terbaik, terutama bisa berguna dalam bidang download rpp pai dan budi pekerti sd kurikulum 2013, Kurikulum 2013, RPP Kurikulum 2013, rpp pai sd kurikulum 2013 doc, rpp pai sd. ![]()
Amazon.com Works Great on Windows x64 with Proper Setup Customer rating 5.0/5.0 February 5, 2012 By S. Bailey Amazon Verified Purchase 40 out of 43 found this helpful Initially, I wasn't sure which PC-Guitar interface to get and I avoided these things for a few years until the companies started producing 64 bit drivers to allow users to run their products on Windows x64. For this device, I am running it through Guitar Rig 5 and Mixcraft with impressive results. I have absolutely NO crackling, noise or latency issues. I have an above average desktop computer with a motherboard sound card and Windows 7 x64.
Update your computer's drivers using DriverMax, the free driver update tool - USB Universal Serial Bus - Behringer - BEHRINGER USB AUDIO 2.8.40 Computer.
If you install Behringer's 64 bit drivers and ASIO4All, configure everything properly, you shouldn't have any problems. For those who've had to run an audio chord from the unit's headphone jack directly to their speakers; this step is not required to get results. If you use ASIO4All and Behringer's USB driver together, you can select your audio output to go directly through your sound card after the signal's been processed through your recording software.
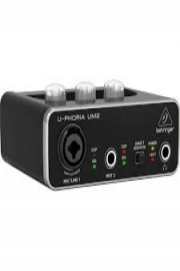
This is why I purchased the device in the first place. Because I wanted to work with a digital signal within my recording and Guitar Rig software. The Behringer UCG102 allows you to do just that. Here are some steps to get you going in the right direction. By the way, I went through some frustrating trial and error getting this device to work the way I wanted in Windows 7 x64. It would be nice if Behringer would update their manual and website to provide better setup instruction.
This, in my opinion, is the only negative against the product. Basic Windows 7 setup. Download Behringer's Windows x64 driver from their web page. Run the Behringer driver setup and when it asks you to reboot; Go ahead and do that. Download and install the ASIO4All drivers from their web page. If the Behringer UCG102 isn't plugged into to the USB port, do that now. If it's already plugged in, remove it and plug it back in again.
This step ensures that the driver is properly loaded and the device is up and running in Windows. Go to Windows 7 Control Panel or do a menu search for 'Sound' to configure your Windows Playback and Recording settings. The Behringer still needs to be plugged in to configure these settings. In your Windows 'Sound' settings, make sure your 'Playback' device is set to your default speakers.
If using headphones, set them as the 'Default' Playback device. Under the 'Recording' tab, select 'Line In' and if the Behringer USB driver is loaded and running properly, you should see an option to select 'Behringer USB WDM Audio 2.8.40' as the Line-in device. The '2.8.40' is the driver version you downloaded from their web page and that number may change as drivers are updated. Now you can start up your Guitar Rig or effects processor software.
In Guitar Rig, you have to go into 'Audio and Midi Settings' and ensure that you are using 'Asio' as your driver and 'Asio4All V2' as your device. Under the 'Routing' tab you have to make sure your 'Outputs' are set to either speakers or headphones. Under 'Inputs', make sure you have 'Behringer USB Audio 1' under just the 'L' or left channel only. The settings under the 'MIDI' tab don't affect this type of setup so there's nothing you need to do there. *** Step 8 is where you will normally run into problems and to fix this, you have to configure your ASIO4All settings. In the far right corner of your Windows taskbar, you should see a green icon, which if clicked will bring up your ASIO4All configuration window. You can also select 'ASIO Config' in Guitar Rig within the 'Audio and Midi Settings' and get into the same window.
To get everything working, you have to click on the wrench to open the ASIO configuration. This is where you'll have to do some trial and error by clicking on the input and output device icons. What you're looking for is a green On/Off button with green arrows next to them for your input and output devices. For example, under my settings, I have the following ASIO devices showing green buttons and arrows. Top selection = Output: 'High Definition Audio Device' Bottom Selection = Input: 'Behringer USB WDM Audio 2.8.40' = (In: 2x 44.1-48kHz, 32 bits; Out: 2x 44.1-48kHz, 32 bits) A blacked out On/Off button icon with no green arrow, or a red 'X' next to these settings means something's wrong or you haven't clicked on the On/Off button icon so that device is actually turned on. Click on the wrench to exit out of the ASIO configuration.
If you're not getting all the selection options in the ASIO or audio/midi configuration settings, try the following. Close Guitar Rig and other recording software 2.